Patio pavers require proper installation to help ensure that the sidewalk, patio, or drive that you are paving lasts for years to come. As you learn how to lay patio pavers you’ll need to spend time and work prepping the area adequately. If you skimp on this labor-intensive aspect of the job, you will soon see the pavers start to move and shift. This means that your pavers are not going to stay as neatly in place as you would have hoped. Generally, to get the best results, paver installation is best left up to a professional landscaping company.
Patios are a wonderful place for us to entertain and enjoy the outdoors. Being set in a beautifully landscaped yard makes a patio that much more enjoyable. If you have your patio prepped and installed by professionals you will be able to enjoy it for years to come. However, knowing how to lay patio pavers is supremely important when you are deciding whether to attempt the installation yourself. While most people hire a professional landscaper, some will want to take on the DIY challenge for themselves. So, let’s take a good look at patio paver installation.
First, what materials do you need for installing patio pavers?
- The Pavers
- Paver Sand
- Paver Base or Crushed Stone
- Polymeric Sand
- Plastic Edging with spikes
- Landscape Fabric
Some of the tools that you will need are:
- Several pieces of 1 inch PVC Pipe or electrical conduit in various lengths
- A 2 x 4 that will be used as a screed
- String, Twine, or lightweight Rope.
- Utility Knife
- Broom
- Tape Measure
- Bubble Level
- Plate Compactor Machine or a Hand Tamper (Can be rented.)
- Wheelbarrow
- Spade or Shovel
- Wood Stakes
- Landscaping Edger Tool
- Hammer and Masonry Chisel or a Circular Saw with a diamond plate to cut the pavers
- Leaf Blower
- Hose and Sprayer Nozzle connected to a water source
- Hammer and Rubber Mallet
- Dust Mask
How to Lay Patio Pavers
When you research “how to lay patio pavers,” you will notice there are lots of material lists and sample instructions.
Just remember that this is really a fairly simple job, but it’s not necessarily an easy job.
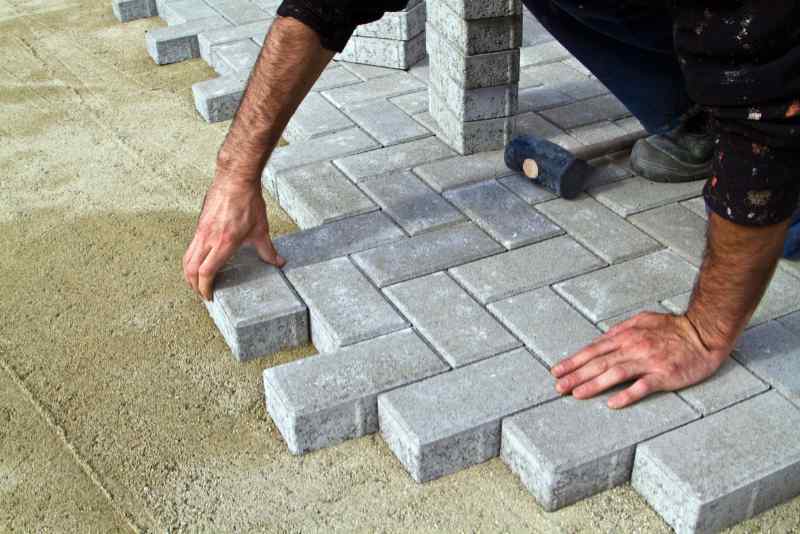
You need to go slowly to ensure that you have done everything well and prepped correctly. Let’s get started on what you need to know about how to install patio pavers.
While you are probably not an experienced stonemason, some homeowners can still do this and do it well. While many stonemasons would use mortar between the pavers, you probably shouldn’t try that. It can get messy and without proper training, you could mess up your new patio. Instead, that’s why you picked up some polymeric sand. Polymeric sand is what you will use to fill in those spaces between your pavers.
Where to Start on your Paver Installation
To begin, you will start with the base. Plan to dig or excavate the area (more on this later). The base will be about 5″ deep gravel with sand on top. The sand will be what the pavers rest on, you will complete the cracks as stated above.
Your patio design is critical in determining how many pavers you will need. While some paver installations take lots of smaller pavers, others will require larger pavers. If you want to make this project a step easier, try to make a design that doesn’t have any cutting. To determine the area, you will need to know what size paver you plan to use and allow for a 1/4″ gap between each paver to ensure that you have accounted for the entire space. Paver patterns come in all sorts of designs, so take a minute to determine which paver pattern you would like to use in your paver installation.
Next, you need to stake out the work area. This will act as a guide to ensure that your pavers are staying on track. You don’t want to get done and discover you don’t have nice straight lines and edges. Using the stakes, put them in each corner of your soon to be a patio. Then run a string around the stakes to make a square or rectangle type space.
Excavating for your Patio or Sidewalk

Next, if we want to learn how to lay a patio using pavers right we are going to do our paver installation safely, correct? So whether you’re building a large backyard patio or small a garden walkway, you will need to call the local authority to come out and mark all of your existing utility lines and systems before you dig. This will ensure that you don’t have an ugly issue later! The twine will show exactly where you plan to dig, at least 5 inches down, remember?
While you are awaiting their arrival, you can also call your local building permit office to ensure you don’t need to pull a permit for this sort of work. Some areas you do and some you don’t.
Once you have the all-clear, you can start to dig around the perimeter of your new patio. If there is grass you should use a landscaper’s edger to get a nice clean cut. It’s good to dig down about 6″, as you want to be sure you have the full 5″ under the patio pavers. If you need to elevate the area a little, just add more gravel.
Continue to remove the grass and dirt from the area. You can make use of the dirt in your garden or in some low spots you have on your lawn. Use the wheelbarrow to haul the dirt and grass away to a compost pile.
If you are installing pavers over a large area you will want to use excavating equipment like a bobcat or a tractor with a blade.
Flatten the Ground
Once you have your hole dug out, you will need to use a plate compactor or manual tamper to flatten down the dirt so that it is nice and smooth. Now is the time to get out of the landscaping fabric. This fabric should be laid down in two layers, with the second one crisscrossed, turned 90 degrees from the other.
After installing the landscaping fabric, you will need to start your gravel base. In this step, you should put on a dust mask, as things will get dusty. Now you will put down a 2″ layer then tamp it down, then apply the next 2″ layer and tamp it so that it is straight and smooth. While doing this, you also want to elevate the gravel to create a slight angle to the patio. Doing so will allow for proper water runoff. The level of this run should be 1:4 from vertical to horizontal. To ensure that you have the proper run, you will use your bubble level to measure it.
Place another layer of landscaping fabric over the top of the stones, so that the sand will not filter down into the stone. Lay your PVC pipes or electric conduit down in such a way that they give you a visual benchmark and help you level your 1″ layer of sand. Pour the sand and screed using the 2 x 4. Now you can begin laying your patio pavers in the pattern desired.

Install your Paver Stones
It’s best to start in one corner of your patio that adjoins a vertical wall if you’re building your patio up against your house or some other structure. Lay the pavers out in the desired pattern. Work outward and downward in a triangular pattern.
Set your pavers onto the sand, placing them straight down and fitting them together. Be careful not to drag the stone through the sand. Give each stone a tap with the rubber mallet to help bed it into place. Strike firmly but don’t hit it hard.
Cut the Pavers as Needed
If your layout design necessitates cutting the pavers, carefully set the stone above the blank space in the layout. Mark a line on the paver using a marker and a straight edge.
The best way to cut your pavers is to use a masonry saw. The use of gloves and eye protection is strongly advised when cutting the stone.
Set the Edging
If your patio is unconstrained by other structures, you should place edging stones along the edge of the patio, setting them with mortar.
Add the Finishing Touches
You’re almost done! To finish your new paver patio apply a light layer of polymeric sand over all the stones. You can sweep the sand into the cracks with a push broom, making sure the gaps are filled. Use more sand as needed. Then run a plate compactor across the entire surface of the installation.
Repeat this process with another light layer of sand spreading it over the patio with the push broom. Use the plate compactor across the patio one final time.

Other Paver Installation Options
Technology is always evolving, even in the masonry and hardscaping industry. Two of the more interesting technologies we’ve seen are the Rise-It Pedestal system and the Silca SoilGrid. We recommend checking out these links; they’re worth consideration for your journey in learning how to lay a patio using pavers.
Final Considerations
The entire process for laying patio pavers is not complicated but it can be demanding, especially if one is not physically fit and used to manual labor. So, as a homeowner, you will need to evaluate whether you have the time and energy to put into a patio project, especially if it’s a large one.
Building a nice paver patio is an outstanding way to add both value and appeal to your backyard or outdoor space. The good news is that you can always call a professional landscaping company to learn more and to get a quote.
Heartland Landscape Group is one of the best landscaping companies at Lake of the Ozarks. We can help you have the patio and the perfect outdoor oasis that you want. Contact us today for a consultation. Our friendly and professional staff will be glad to answer questions and help you make a plan and get started.

7 Backyard Fire Pit Ideas – Landscaping Your Home Hideaway
There are lots of backyard fire pit ideas landscaping lovers are building into their outdoor living spaces. Fire features are extremely popular among people who

5 Planning Tips to Improve Your Yard Landscaping at Lake of the Ozarks
What would you like to have in your dream yard landscaping plan? Would you love to have a pool? Or maybe a waterfall and a

Winter Hardscape Projects for Lake of the Ozarks Missouri Homes
Even though it’s getting colder, that doesn’t mean that you can no longer make excellent use of the off-season here at the Lake to implement